Shade Sail Installation Guide in 8 Easy Steps!
Shade Sail Installation Guide - How to Install your Garden Sun Shade Sail!

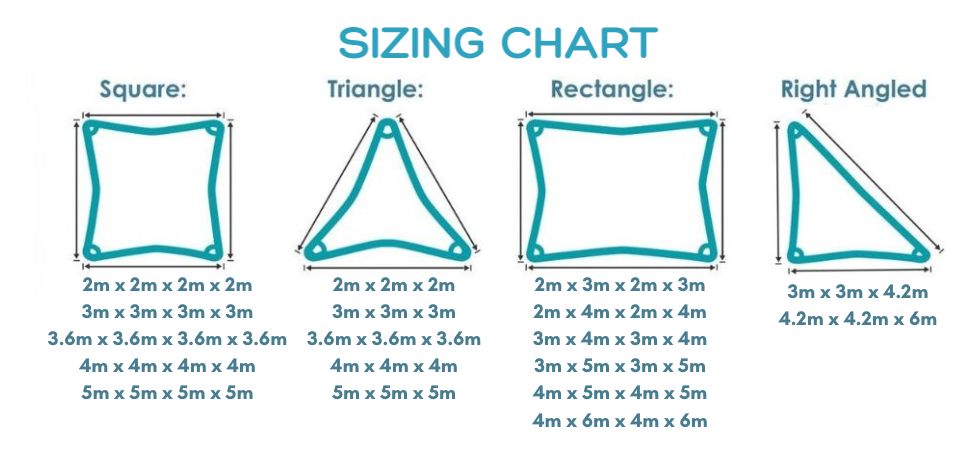
1. Decide what shape will work well with your area, and how much cover you want
We have a range of ready made shade sails available, but if you can't find the size, shape or colour you need, we also offer a DIY Made to Measure Shade Sail service, or our partner supplier can provide you with Bespoke Conservatory Roof Shade Sail Blinds, which includes a measuring and installation service.
2. Decide what fixtures you need
Screw in Hooks or Eyelets
 These work well for our smaller shade sails, for temporary installations or in a conservatory.
Shade Sail Fixture Kits

3. Measure the area to make sure your new shade sail will fit
The measurements given on our shade sails are the widest part, and include the D Rings in each corner. You then need to measure any fitments or hooks you will be using to secure the sail to, and make sure you have made allowances for angling and pulling the shade sail as tight as possible, so the material is completely taut. The recommended space for tensioning the sail is approximately 10% from each corner, usually between 0.1m and 0.75m depending on the size of the shade sail.


To help with your measurements, if you are planning on using a fixtures kit, here are the sizes of our Clara Shade Sails Turnbuckles, Pad Eyes and Carabiners.
We also include 1.5m lengths of nylon rope for each D Ring with our ready made shade sails, just in case you need that extra length. There is no reason why you couldn’t use longer rope if needed - you can see examples of this in our Customer Gallery, where other shade sail users have done this. You can also find other examples of some of the different ways our customers have installed their shade sails.
4. Place your order with Clara Shade Sails!
Click here to visit our Shade Sail Collection Page
If you do make a mistake with your measurement, you can always exchange the unused sail for the correct shape or size – just get in touch with us for further information.
5. Do you need posts to fix your sail to?

You can use metal or wooden fence posts that can be purchased from any DIY store. A diameter of 125mm for round poles/posts, and 125mm x 125mm for a square pole/post would be a good minimum size.
Based on the length of the sail, plus your fixtures/hook length, measure from your other fixed points, and dig a suitably deep hole for you pole or post. Make sure your pole or post is fixed securely in the ground, using a mixture of gravel and concrete to keep the pole or post in place and to stop any movement.
You can also find a video on the British Sign Language website for a program called You, Me, Garden?, which shows one of our shade sails being installed using posts.
6. Make sure you angle your sail

To avoid rain water pooling, you need to angle your sail so that:
Triangle Sails have at least one corner that is at an angle of 20-30 degrees lower than the others.
Rectangle and Square Sails have two corners that is at an angle of 20-30 degrees lower than the others.
7. Add your fixtures and attach your sail
Allowing for the higher and lower corners, decide where your fixtures need to be placed.

Screw in hooks/eyelets – Screw in your hooks or eyelets and fasten the sail using the cord provided, making sure you pull the ropes as tight as possible.
Fixtures - Fix the pad eyes to your posts or brickwork (we recommend screws that are a minimum of 2.5cm long, and if you are fixing to bricks or masonry, you use suitable raw plugs – not supplied), clip the sail corners on using the carabiner, and connect the turnbuckles, tightening up as much as you can to avoid a saggy sail! If you use ropes to connect any of your fixtures, then make sure you pull the rope as tight as possible.
8. Admire your new Shade Sail, and send Clara Shade Sails a picture so we can see how you’ve done 😊
